 Get Kenney Game Assets All-in-1 to download everything at once, plus free updates!
You might be wondering why you'd spend time creating a game for a game console released over 40 years ago. Consoles like Atari 2600 have a lot of limitations regarding processing power, visuals and sound. Working with these limitations can make a fun distraction from larger projects and being forced to keep a small scope, use simple graphics and come up with a basic game design can be an interesting challenge.
The guide is written for Windows however the compiler mentioned below is also available for Linux and macOS, emulators are also available for these platforms.
Introducing Batari BASIC
Typically games for these type of consoles would be written using assembly. This can be extremely daunting especially if you aren't experienced with programming or not knowledgeable on computer hardware. Batari BASIC makes it a lot more approachable using an easy to write language which allows you to get a game working almost immediately, not having to worry about low level struggles.
Installing Batari BASIC
To compile games we'll need to install Batari BASIC. Download the package available here (click 'Releases' on the right) and extract the files to a folder where you'd like to install. Execute install_win.bat which will set the environment variables to the current path, basically a shortcut to the program you can use in the command prompt.
Compiling a game
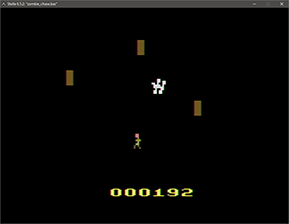
We'll start by compiling one of the included sample projects to get a hang of compiling and running games. Copy or drag zombie_chase.bas from the included samples folder onto 2600bas.bat. This will compile the game and generate a bunch of new files. You can also use the command prompt if you rather use that.
Among the newly generated files will be a bin file called zombie_chase.bas.bin, this is the rom file we can run using an emulator.
Atari 2600 emulator
There are many emulators available for all sorts of devices allowing you to play Atari 2600 games. Personally I'd recommend using Stella which is free and open source, you can grab Stella here, after installing open it and select the newly created bin file.
In the game you have to hit zombies, use the arrow keys to steer and spacebar to drive.
Your first game
Create a new text file and save it as a bas file. This will be the source code for your game. I will guide you through some basic code, feel free to copy it into your project. The code will be explained below it, starting with some base code;
main
drawscreen
goto main
There's a space before each of the lines except the first one, that's because the first line defines a function with the name main. The second line renders the screen and the last line goes back to the main function and repeats the process.
You'll see a blank screen after compiling and running the code - which is understandable since we haven't rendered anything to the screen yet. Before the code we already added, add the following code;
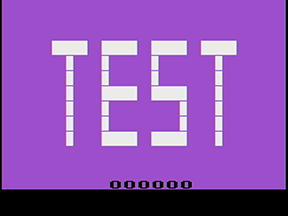
COLUBK = $68
COLUPF = $0E
It might appear confusing at first, but all it does is define a color value for the foreground and background. The first value COLUBK is the background color, the second value COLUPF is the foreground color. Now we need a picture to render, add the following before the color definition;
 playfield:
 ................................
 ................................
 ...XXXXX..XXXXX..XXXXX..XXXXX...
 .....X....X......X........X.....
 .....X....X......X........X.....
 .....X....XXXXX..XXXXX....X.....
 .....X....X..........X....X.....
 .....X....X..........X....X.....
 .....X....XXXXX..XXXXX....X.....
 ................................
 ................................
end
As you might've been able to tell this renders the word TEST as the background for our game. If you compile the game now and run it in the emulator you should see the screen shown below. Don't worry if you're having trouble placing the code in the correct order, at the bottom of this guide you'll find the full source code.
During gameplay you can redraw the background, add or remove blocks and check for collisions. For now, lets move on by adding a player sprite.
Adding a player
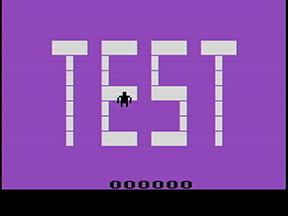
Add the following code just below the definition of the playfield (background);
 player0:
 %00100100
 %00100100
 %10111101
 %10111101
 %10111101
 %01111110
 %00011000
 %00011000
end

 player0x = 16
 player0y = 16
Similar to how the background was defined the first chunk of the code is what the player sprite will look like. It's a little harder to see because of the characters, the sprite is also upside down.
The last two lines define the position of the player on the screen (16 × 16). If you compile and run the game a player sprite will show up, but it won't react to controls yet. Add the following code just after the main function definition;
 if joy0up then player0y    = player0y - 1 : goto control_done
 if joy0down then player0y  = player0y + 1 : goto control_done
 if joy0left then player0x  = player0x - 1 : goto control_done
 if joy0right then player0x = player0x + 1 : goto control_done

control_done
The first four lines tell the player position to change by 1 unit each time the joystick changes direction. After each movement it skips to the bottom line, this is because we'd just want to check for one direction to move in and continue the code for performance reasons. control_done is a function definition just like main however in this case it is merely used to skip over a part of the code.
Adding an item
Next we'll add an item for the player to collect. First it'll spawn at a static position on the screen, after collection it'll be respawned at a random screen position. First we'll define the sprite of the item, place this after the definition of the player0 sprite;
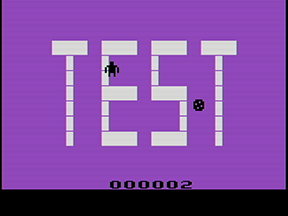
 player1:
 %00000000
 %00111100
 %01101110
 %01111010
 %01011110
 %01110110
 %00111100
 %00000000
end

 player1x = 32
 player1y = 32
The sprite looks like a chocolate chip cookie (the best type of cookie) which will be spawned at 32 × 32. Now lets add collision with the player, add the code below somewhere in the main loop;
if collision(player0, player1) then score = score + 1 : player1x = rand&127 : player1y = rand&63If the player (player0) collides with the item (player1) 1 point gets added to the score at the bottom of the screen. Actions on the same line are separated by the : character, so on the same line we can set the item position to a new random position.
The X position is set to rand&127 which is a random value between 0 and 127. The Y position is set to rand&63 which is a random value between 0 and (you guessed it) 63. This places the item roughly on the screen, it can still sometimes appear close to the boundaries. You could add a static value to it and choose a smaller maximum random value.
Completion
If you compile and run your game you should see a background, a player and an item which can be picked up to gain score. This is a really simple example but I hope you're excited enough to continue learning.
Further reading
Now that you've made a very basic game you can continue by reading the documentation available here, also check out the sample files packed with Batari BASIC for basic tips and tricks on how to achieve certain functions and effects.
If you want your game to be flashed to an actual Atari 2600 cartridge check out this link. You can also check out the game I've made, Wizards & Dinosaurs!